
Backup & Data Protection
How to Migrate to a New NAS Without Losing Data
Move to a new NAS safely with a staged migration plan, checksum verification, application cutover, rollback and old-NAS retention.
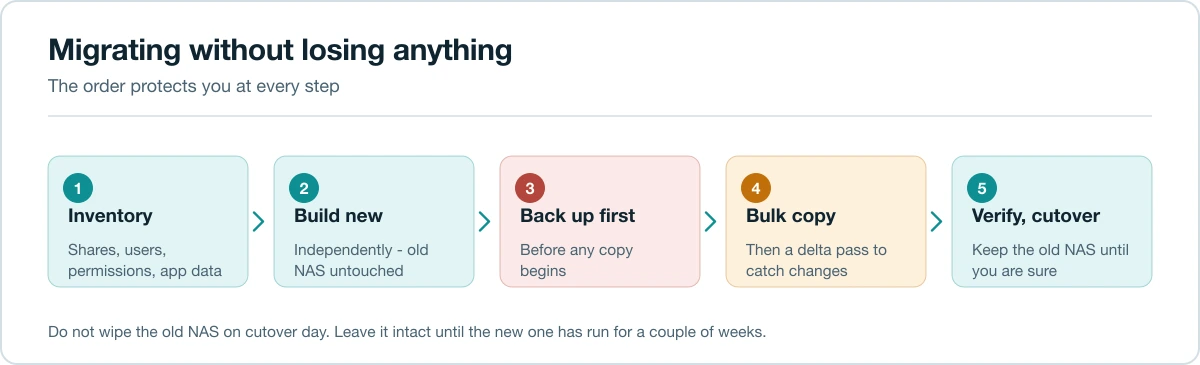
Quick answer: Build and test the new NAS before touching the old one, keep an independent backup, make an initial copy while users continue working, freeze writes for a short final synchronization, verify files and applications, then keep the old NAS unchanged until the new system has survived a defined acceptance period.
A migration is not “move the drives and hope.” It changes storage hardware, operating system, permissions, network names, application paths and often RAID layout at the same time. The safest plan separates those risks.
Choose the migration method
| Method | Best for | Main risk |
|---|---|---|
| Vendor migration tool | Same-vendor supported models | Compatibility limits and migrated misconfiguration |
| Network copy/rsync | Cross-vendor or clean rebuild | Permissions, metadata and long transfer time |
| Backup and restore | When a clean recovery test is valuable | Slowest; application restore details |
| Move existing drives | Only when explicitly supported | Highest hardware/model compatibility risk |
Synology Migration Assistant can migrate data, packages and system configuration between supported devices, but the source/destination DSM and model requirements must be checked before purchase. Other vendors have their own tools. Never assume drives from one platform will import into another.
Phase 1: inventory the old NAS
Record:
- Shared folders, sizes and growth.
- Users, groups, ACLs and service accounts.
- SMB/NFS settings and client mappings.
- Containers, databases, virtual machines and package data.
- Snapshots, backup jobs and encryption keys.
- Static IP, DNS names, certificates and firewall rules.
- Scheduled tasks and notification targets.
Export configuration where supported, but also take screenshots or a written record. An export may not include every package or secret.
Phase 2: build the destination independently
Install supported drives, update firmware and NAS software, run extended drive tests, create the storage pool and enable alerts. Choose the final RAID/ZFS layout now; changing it during or immediately after migration adds risk.
Give the new NAS a temporary hostname and IP. Do not reuse the old identity until cutover, or clients may write to the wrong system.
For capacity planning, see How Many NAS Drive Bays Do You Need? and RAID 5 vs RAID 6 vs SHR.
Phase 3: make a backup before copying
Migration is not a backup. A copy command can reproduce deletion or corruption. Confirm an independent local or offsite copy exists and restore a sample. Preserve encryption keys outside both NAS devices.
Use the 3-2-1 backup plan for irreplaceable data. If no full backup exists, delay migration rather than turning the old NAS into the only source for a risky operation.
Cross-platform permission mapping
SMB account names can look identical while underlying UID/GID and ACL semantics differ. Create test users on the destination, copy one representative folder and verify read, create, rename and delete operations before bulk transfer. Preserve special permissions only when the destination understands them; otherwise document a deliberate remapping.
Phase 4: run the initial bulk copy
Copy data while the old NAS remains live. Prefer a resumable tool that preserves timestamps and required metadata and produces logs. For cross-platform moves, test one small share first.
A standard rsync pattern for the bulk pass:
rsync -avh --progress --partial /volume1/share/ user@new-nas:/volume1/share/
Run the same command with --dry-run first to preview what will transfer, and after the copy spot-check critical folders with a checksum pass (for example rsync -avhc --dry-run on a sample directory) before trusting byte totals alone.
Estimate duration:
hours = data in terabits ÷ sustained gigabits per second ÷ 3600
At a real 200 MB/s, copying 20 TB takes about 28 hours before small-file and verification overhead. Millions of tiny files can be much slower than a few large media files.
Do not judge completion only by byte totals. Sparse files, hard links, ACLs and application databases may require special handling.
Phase 5: migrate applications deliberately
Stop databases or use their supported export/backup process. Containers need Compose/configuration, secrets and persistent volumes—not the replaceable image layers. Virtual machines should be shut down or exported through the hypervisor so disks are consistent.
Create a per-application test:
- Can it start on the new NAS?
- Can users authenticate?
- Are file paths and permissions correct?
- Does it connect to its database?
- Can it create, update and delete a test record?
Phase 6: final sync and cutover
Announce a maintenance window and make source shares read-only. Stop applications, run a final incremental synchronization and capture its log. Then move the hostname/IP or update DNS and client mappings.
Keep the old NAS offline or read-only. Do not immediately erase it. A 14- to 30-day acceptance window is reasonable for home use; business systems may need a formal sign-off.
Cutover communication
Even a home migration benefits from a short notice: when writes stop, which services are unavailable, the new hostname and how problems should be reported. For a business, define the person who can approve rollback.
Rollback should be simple: disconnect the destination identity, return the old NAS to its original hostname/IP, and reopen shares only after confirming no split-brain writes occurred.
Verify the migration
Use several layers:
- Compare top-level folder and file counts.
- Compare total logical size while accounting for filesystem differences.
- Generate and compare checksums for critical datasets or a statistically meaningful sample.
- Open representative large, small and non-ASCII filenames.
- Test permissions using ordinary users, not only administrators.
- Run application tests and a backup from the new NAS.
- Reboot the destination and confirm services return.
Post-migration acceptance checklist
- Storage pool and all drives report healthy.
- Expected datasets, snapshots and shares exist.
- Ordinary users can access only intended paths.
- Applications survive a reboot.
- Scheduled jobs use the new paths.
- Backups complete and a restore works.
- Monitoring/alerts reach the correct recipient.
- UPS shutdown and startup behavior is tested.
- Performance is compared with a pre-migration baseline.
Common failure points
- Permissions changed: UID/GID or ACL models differ across platforms.
- Clients still reach old NAS: stale DNS, cached SMB sessions or hard-coded IPs.
- Database corrupt after copy: live files were copied without an application-consistent snapshot/export.
- New pool fills unexpectedly: snapshots, recycle bins or filesystem overhead were omitted from planning.
- Backups stop: destination paths, credentials or encryption settings changed.
When to retire the old NAS
Only after the new system has passed verification, backups and restore tests. Then securely erase or repurpose drives according to data sensitivity. If the old NAS becomes the backup target, rebuild its permissions so compromise of the primary cannot administer both systems.
FAQ
Can I copy data while people keep working? Yes for the initial pass. Freeze writes for the final incremental sync so changes are not missed.
Should I reuse the old IP? It simplifies clients, but only after the old NAS is offline and the new one is verified. Avoid duplicate-IP periods.
Can I just move the disks? Only when the vendor explicitly supports the exact source, destination and pool format. Keep a backup regardless.
How long should I keep the old NAS? Long enough to cover application and user acceptance, commonly 14–30 days at home. Keep it read-only or offline.
What if verification finds differences? Do not erase the source. Classify expected metadata differences vs missing/corrupt data, correct the copy method and rerun the final sync.
Sources
Related guides
Last reviewed: July 2026.