
Backup & Data Protection
How to Back Up a Synology NAS to Backblaze B2 (Step by Step)
Step-by-step guide to backing up a Synology NAS to Backblaze B2 with Hyper Backup — encrypted, scheduled offsite backup for a few dollars per TB.
Quick answer: Use Hyper Backup, not Cloud Sync. Create a dedicated B2 bucket, generate an application key scoped to that bucket only, enable client-side encryption, set a retention policy, and then restore a file to prove it works. Cloud Sync mirrors deletions and encryption to the cloud — Hyper Backup keeps versions.
Backblaze B2 has become the default offsite target for home NAS users because object storage is priced very differently from consumer sync services. The setup takes about twenty minutes, and the parts people get wrong are all in the details.
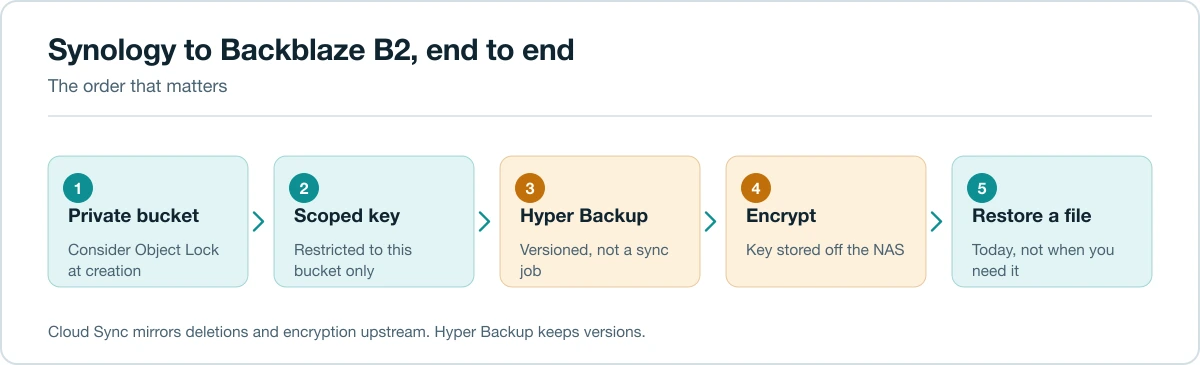
Step 1 — Create the bucket
In the Backblaze web console, create a bucket and set it to Private. Use a name you will recognise — bucket names are globally unique, so something like yourname-nas-backup works.
Two settings worth considering while you are here:
Object Lock. If enabled at bucket creation, it lets you keep versions that cannot be deleted before a retention period expires — even by someone holding your credentials. This is the single strongest control against ransomware reaching your backups. It has to be decided at creation time on most configurations, so think about it now rather than later.
Lifecycle rules. These control how long B2 keeps previous versions of files. Leave them alone until your backup retention is configured, then align the two so you are not paying to store versions your backup software already considers expired.
Step 2 — Create a scoped application key
Do not use your master application key. Create a new one restricted to this single bucket.
Why it matters: the NAS stores this credential. If the NAS is compromised, the attacker gets whatever that key can do. A key scoped to one bucket cannot touch anything else in your account.
Copy the keyID and applicationKey immediately — the secret is shown once.
Step 3 — Install and configure Hyper Backup
On the Synology, install Hyper Backup from Package Center, create a new backup task and choose Backblaze B2 as the destination (it appears under S3-compatible or as its own entry depending on your DSM version).
Enter the key ID, application key and bucket name.
Step 4 — Choose what to back up
Select the shared folders that matter — documents, photos, application data — plus the application configuration if you want a fast rebuild after a hardware failure.
Think carefully about media libraries. They are usually the largest thing on the NAS and often the least painful to lose. Excluding re-acquirable content can cut the bill substantially. Be honest, though, about home videos and anything you produced yourself.
Step 5 — Turn on client-side encryption
Enable encryption in the task settings. This encrypts data before it leaves the NAS, so Backblaze stores ciphertext and cannot read your files.
Download the encryption key file and store it somewhere other than the NAS — a password manager, a printed copy in a safe, another machine. Without it the backup is unrecoverable. This is the most common way people discover their backup is worthless.
Step 6 — Set the schedule and retention
Schedule the task for a quiet hour. Nightly is right for most people.
Retention is where you decide how far back you can recover. Hyper Backup's Smart Recycle keeps an intelligently thinned set of versions — hourly for a day, daily for a month, weekly beyond that — which is a sensible default. Set it deliberately rather than accepting whatever is preselected.
Retention matters because ransomware and corruption are often discovered weeks later. Seven days of history may contain no clean copy. See NAS backup retention policy.
Step 7 — Run it and expect the first one to be slow
The initial backup uploads everything, and it is limited by your upload speed, which is typically a fraction of your download rate. A few hundred gigabytes over a modest connection can take days.
Let it run. Subsequent backups only send changes and finish quickly. If the first run is genuinely impractical, back up your most critical folders first and add the rest afterwards.
Step 8 — Restore something, today
This is not optional and it is the step people skip.
Open Hyper Backup Explorer, browse the backup, and restore a single file to a temporary location. Open it and confirm it is intact.
Then confirm you can answer these without looking at the NAS:
- Where is the encryption key stored?
- What are the B2 credentials, and where are they written down?
- How would you restore if the NAS itself were gone?
A backup you cannot restore under those conditions is not a backup.
Costs and the number people miss
B2 charges for storage per terabyte-month, and separately for downloads when you restore.
Storage is cheap and predictable. The download cost is what surprises people during a full recovery — check the current free egress allowance and the per-gigabyte rate before you commit, and work out what restoring your entire dataset would cost. If that number is uncomfortable, adjust what you are backing up rather than discovering it on a bad day.
There is also a physical restore option for very large recoveries, where Backblaze ships a drive. Worth knowing exists.
Hyper Backup or Cloud Sync?
Hyper Backup keeps versions, supports client-side encryption and is a backup tool.
Cloud Sync mirrors a folder. Delete a file locally and it disappears from the cloud. Ransomware encrypts your files and the encrypted versions sync up. It is a synchronisation tool that people mistake for a backup.
Use Hyper Backup for this job. See Hyper Backup vs Cloud Sync for when each is appropriate.
Where this fits
This gives you the offsite leg of the 3-2-1 backup rule. You still want a local second copy for fast everyday restores — recovering a deleted folder from an external drive takes minutes, from the cloud it takes as long as your connection allows.
Other providers work the same way if you prefer them — see best cloud backup for NAS.
FAQ
Can I do this on QNAP or TrueNAS? Yes. QNAP uses Hybrid Backup Sync; TrueNAS uses Cloud Sync Tasks or a tool like restic or rclone. The principles — scoped credentials, client-side encryption, versioned retention, tested restores — are identical.
How long does a restore take? Limited by your download speed. Calculate it in advance so the number is not a surprise.
Is versioning the same as Object Lock? No. Versioning keeps old copies; Object Lock prevents them being deleted before a set date, including by someone with your credentials.
Should I back up the whole NAS or just data? Data plus configuration exports. Restoring a fresh DSM and importing configuration is usually faster and cleaner than a full system image.
Last updated: August 2026.