
Self-Hosted Apps
How to Set Up Home Assistant on a NAS or Home Server
Run Home Assistant, the powerful open-source smart-home hub, on your NAS. We compare the container and VM install methods and how to get started.
Quick answer: Home Assistant runs well on a NAS as a container, but you give up the Supervisor — which means no one-click add-ons and no built-in backup UI. If you want the full experience, run Home Assistant OS in a virtual machine instead. And whichever you choose, plan USB radio passthrough before you buy a Zigbee or Z-Wave stick, because that is where NAS installs most often come unstuck.
Home Assistant is the most capable open-source smart home platform, and it is also the one with the most consequential installation decision. Getting this right at the start saves a migration later.
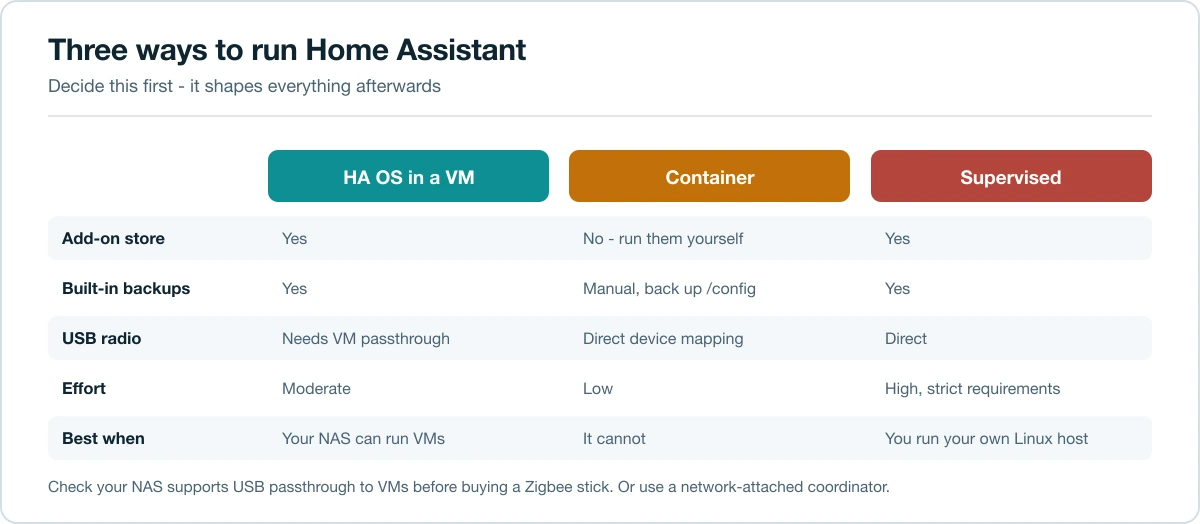
Choose your installation method first
This decision shapes everything afterwards.
| Method | Add-on store | Backups | USB devices | Effort |
|---|---|---|---|---|
| HA OS in a VM | Yes | Built-in | Needs USB passthrough to the VM | Moderate |
| Container on the NAS | No | Manual | Direct device mapping | Low |
| Supervised on Linux | Yes | Built-in | Direct | High, specific requirements |
Home Assistant Container is what you get from Docker. It is the core application only. Add-ons — Mosquitto, Zigbee2MQTT, ESPHome, Node-RED — are not available, because add-ons are managed containers and there is no Supervisor to manage them. You run those as separate containers yourself, which is perfectly workable and more assembly.
Home Assistant OS in a VM gives you the complete product: add-on store, built-in backups, guided updates. If your NAS supports virtual machines (Synology Virtual Machine Manager, QNAP Virtualization Station, Proxmox, Unraid), this is the better path for most people.
Recommendation: if your NAS can run a VM, run HA OS in one. If it cannot, use the container and accept that you will manage the supporting services yourself.
The USB question — settle it before buying
Most useful smart home setups need a radio: a Zigbee coordinator, a Z-Wave stick, or a Bluetooth adapter.
In a container, map the device in:
devices:
  - /dev/ttyUSB0:/dev/ttyUSB0
Use the stable path under /dev/serial/by-id/ rather than /dev/ttyUSB0, because the number can change between reboots and your Zigbee network will silently stop working.
In a VM, you must pass the USB device through to the guest. Support varies by platform, and some NAS hypervisors are limited here. Check that your specific NAS model supports USB passthrough to VMs before buying the stick — this is the single most common way people end up stuck.
A way around it entirely: network-attached coordinators. A Zigbee coordinator with an Ethernet or Wi-Fi interface removes the USB problem completely and lets you place the radio somewhere with better coverage than the cupboard your NAS lives in. Often the better answer regardless.
Step 1 — The container setup
services:
  homeassistant:
    image: ghcr.io/home-assistant/home-assistant:stable
    container_name: homeassistant
    restart: unless-stopped
    network_mode: host
    privileged: true
    volumes:
      - ./config:/config
      - /etc/localtime:/etc/localtime:ro
    environment:
      - TZ=Europe/London
network_mode: host matters here. Home Assistant discovers many devices by mDNS, SSDP and broadcast traffic, and bridged Docker networking blocks those. Without host networking, half your devices will not be found automatically.
The consequence is that Home Assistant occupies port 8123 on the host directly.
Step 2 — First run
Open http://your-nas-ip:8123, create your account, set your location and units.
Home Assistant will immediately suggest devices it has discovered. Adding a handful of integrations at this point is a good way to confirm networking is working.
Step 3 — Add the services you would have got as add-ons
If you are running the container, these are separate containers:
- Mosquitto — an MQTT broker, needed by many integrations.
- Zigbee2MQTT — Zigbee devices via MQTT, an alternative to the built-in ZHA integration.
- ESPHome — for DIY sensors.
- Node-RED — visual automation, if you prefer it to YAML.
Put them in the same Compose file so the whole stack comes up together. See Docker on a NAS.
Step 4 — Back it up, and understand what breaks
Home Assistant becomes load-bearing quickly. When it is down, lights, heating and locks stop responding, and other people in the house notice immediately.
In a VM, use the built-in backup feature — Settings → System → Backups — and copy those backups off the VM to your NAS storage.
In a container, back up the entire config folder. It contains your configuration, automations, the .storage directory with all your integration settings, and the SQLite recorder database.
The recorder database can grow to gigabytes. Either exclude it from backups (you lose history, not configuration) or configure a shorter recorder retention period — which is worth doing anyway, since a large database on a spinning disk makes the whole interface sluggish.
Get the backups offsite like anything else — 3-2-1.
Step 5 — Updates need a plan
Home Assistant releases monthly, and breaking changes are normal. Integrations get deprecated, configuration formats change, and an unattended update can leave automations broken.
The routine:
- Back up first. Every time.
- Read the release notes, specifically the breaking changes section.
- Pin the tag to a version rather than
stableonce your setup matters. - Do not update the day before you go away.
Step 6 — Remote access
Home Assistant should not be port-forwarded. It controls physical things in your house.
Use Tailscale — the mobile app works over it exactly as it does at home. If you need a public URL for webhooks or voice assistant integrations, use a reverse proxy with proper authentication, and set trusted_proxies in the HTTP integration or Home Assistant will reject the forwarded requests.
Should it live on the NAS at all?
An honest note. Home Assistant on the NAS means:
- A NAS reboot takes your smart home down with it.
- Storage maintenance and home automation share a failure domain.
- The recorder database writes constantly, which keeps spinning disks awake and can prevent drive spin-down entirely.
Many people end up running Home Assistant on a separate small device — a mini PC or a Raspberry Pi — and keeping the NAS for storage. It costs a little more and removes an entire category of Sunday-evening problem. Worth considering before you commit.
FAQ
Can I move from container to HA OS later? Yes. Take a backup, install HA OS, restore. The backup format is portable across installation methods, which is a good reason to start with backups working.
How much RAM does it need? 2 GB is workable, 4 GB comfortable. The database and add-ons are what consume it.
Why can't it find my devices? Almost always bridged networking. Use network_mode: host.
Can I use it with Pi-hole on the same NAS? Yes, but watch for port conflicts — both want host networking or specific ports. See how to set up Pi-hole.
Related guides
Last updated: August 2026.